

I am loving my ladies tailoring class at FIT (Fashion Institute of Technology)!
At last night's class, our professor taught us how to make a side pocket, complete with top pocket and under pocket facings, and with the pocket bag finished with French seams. This is a technique that could also be used on men's trousers. (The pattern pieces would look almost exactly the same, but instead of attaching the pocket to a skirt front, they would be attached to the left and right pants fronts.)
Here are the pattern pieces involved: the two pocket bags (top and "under") and their respective facings. Also (naturally) you'll need the skirt front. The facings are cut from the skirt fabric; the pockets are made from cotton pocketing (I used cotton sateen).


I learned something which had confused me in the past: when we're talking about the "wrong" side of a pocket, we're talking about the inside, the part that has contact with your hand. The right side of the pocket is the side visible from inside your skirt (or pants). To avoid confusion, we will mark the wrong side of every piece of fabric with a chalk "X." It may not seem necessary, but when things get complicated later on, you'll be glad you did.
The diagonal (bias) edge of the under pocket facing is pressed under at 1/4" and hand basted to the under pocket bag. You're also basting the bottom. The outer and top edges are left free (they can be pinned for now). Notice the white chalk "X" on my black pocket bag (2 pics down). This will be the inside (wrong side) of my pocket. After basting, these edges are edgestitched, roughly 1/8" along the diagonal edge, or as close as you can get to the edge, and 3/8" along the bottom.

This is the right under pocket and facing:

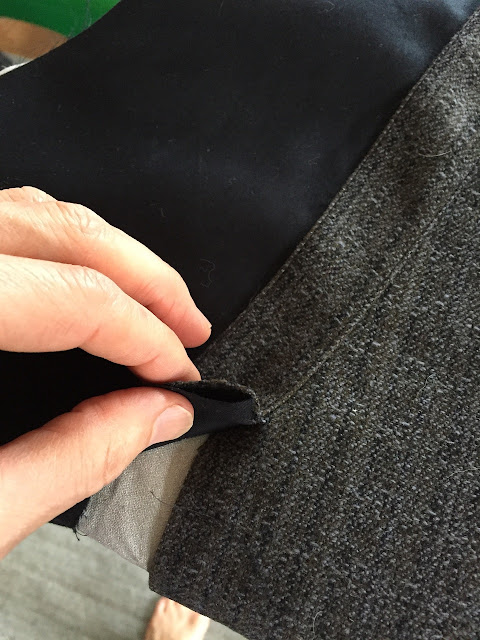
The top pocket facing, which is cut on the grain to provide support for the bias cut skirt edge and pocket bag edge, is also pressed under 1/4" and hand-basted to the skirt edge, with the top pocket bag underneath: three layers of fabric. Were you to swing the bag out, it would look like this -- the photo below shows the left top pocket bag and facing.

After hand-basting, the basted edge will be stitched by machine at 1/4". After stitching, the facing edge is graded approximately 1/8" to prevent bulk. Remember that there are three layers here: the top pocket facing, the skirt, and the top pocket bag.

Notice that the facing piece juts out approx. 1/4" toward the bottom edge. You will sew only to the point where it juts out. Everything below it must remain free. After stitching, you will clip through all three layers to the stitch line, or approx. 1/4", but not beyond it. With the top pocket facing flipped over onto the top pocket bag, edgestitch on the facing side down to the clipped point. Edgestitch the folded-under edge of the facing to secure it to the top pocket bag. Stitch the bottom edge as well. Do you recognize what part of the pocket this will be? If not, stop and figure it out.
 |
| Left side under pocket and attached facing. Notice the portion that juts out is left free. |
Notice that everything below where you clipped is free.
 |
| This is the right side under pocket and facing. |
Now, turn the top pocket bag over so it's right-side-up. (You'll probably want to turn the entire skirt over.) Place the under pocket bag, with facing edgestitched down along its diagonal edge (remember this was turned under and pressed at 1/4" first) as well as along its bottom edge, so that the pocket bags are right sides together. Pin. You should see the chalk X on your under pocket bag facing up toward you. From here on we're dealing with the right side pocket only:

Now stitch along the matched pocket bag layers, along the inside edge (below where the facing is attached), and along the bottom and outside edges, at 1/4". The top edge is left free. After stitching, trim 1/8" off, leaving roughly 1/8". Make sure the stitching secures both layers. Now turn the pocket bag right side out and carefully press. Push out the seams with a point presser if need be.


After pressing, stitch the same edges at 1/4", enclosing the raw edges of what is now the inside of the pocket.

Matching your top notches and turning the skirt right-side up, the right side pocket will look like this:

One more step: you want to secure the top and bottom of the pocket without having to tack it from the outside (like jeans). Instead, you'll be tacking it from the underside. Flip the skirt wrong side up and fold out the pocket bag. On the skirt side mark 1" down with chalk and 1/4" perpendicular, toward the pocket bag. Make another 1/4 chalk mark where you clipped through all layers of the bag, skirt, and facing. Stitch along these chalk marks.


Flip your skirt right side up, match your top and side notches, and gently press your pocket, using minimal steam AND A PRESS CLOTH. Voila!
Right side pocket.

Left side pocket.

From inside the skirt, the left side pocket bag looks like this: beautifully finished with raw edges enclosed.

I don't know if this is clear but I certainly hope so. If not, please ask and I'll clarify.
Next week -- darts and more!
Have a great day, everybody!


You have so much patience … but we knew that.
ReplyDeleteThanks for presenting so much detail! I am learning so much, including:
1) I never knew that the "wrong" side of a pocket is the part that has contact with your hand.
2) You have such beautiful toes! :) :)
Stunning, beautifully explained, though not for the faint of heart.
ReplyDeleteYour growth is a delight to witness!
What a lovely finish inside and out, and it does have a professionally "tailored" look too. What a wonderful class. Thanks for sharing, this will be my go-to pocket tutorial in future :) You do sew some very lovely garments Peter!
ReplyDeleteWOW! That is fantastic! I love pockets and am going to have to try it. Thanks for the walk through.
ReplyDeleteI was SO distracted by the tiny little feet I couldn't concentrate on pockets. Just at the end I realized they are farther away on the floor so look tiny. Now I can re-read for the actual pocket learning.....
ReplyDeletececi
The under pocket will be sewn into the side seam correct? In menswear tailoring that would be left out of the side seam ;) and later pressed over the finished side seam.
ReplyDeleteBEAUTIFUL! Beautiful fabric too! Thanks--I am truly thrilled and look forward to trying this on my next skirt. Pockets in women's wear are usually too small and too flimsy--these look perfect. Kristina
ReplyDeleteGlad I'm not the only one who was distracted by toes!
ReplyDeleteI am very jealous of your ability to take these sewing classes! I still work, so learn little bits at a time, but it is forward progress nonetheless. ☺️
ReplyDeleteBeautiful work! I hadn't noticed the toes, so I went back for a peek. Very sweet tootsies Peter x
ReplyDeleteYour post made me remember when I was taking a tailoring class at L.A. Trade Tech college. Sewing a pocket can be a challenging technique for sure. You have nice toes, by the way! :)
ReplyDeletePeter - anybody tell you, you have nice toes. ;-) Thanks for all the informative input on your site!!!!!!
ReplyDeleteEncasing the pocket edge of the skirt front with the pocket facing and bag... brilliant! It's those kind of tips and techniques that make a class so worth while... thank you so much for sharing!
ReplyDeleteMoses supposes his toeses are roses,
ReplyDeleteBut Moses supposes erroneously,
For nobody's toeses are posies of roses,
As Moses supposes his toeses to be.
Beautiful pockets!
ReplyDeleteBeautiful pockets!! Nice Pho"toe" bomb! LOL
ReplyDeleteGreat tutorial. Thank you so much!
ReplyDeleteWhen you get to the kick pleat I'd be interested to know looking at the exterior of the skirt as worn on the body, if the kick pleat is supposed to be left over right or right over left. I think you said earlier the skirt will only be half lined, but if it is fully lined I'd love to know the proper technique. I will be lining a skirt with a kick pleat this weekend for the first time ever so I'm just using some internet tutorials.
ReplyDeleteAnd will the lining be attached to the zipper?
DeleteStay tuned, campers! (I really am curious about the lining technique. And will it be...improper? Ooh!)
This is indeed more-or-less he way it is done in men's tailoring, except that the pocket bags are cut in one-piece rather than two pieces.
ReplyDeleteVogue V1417 (Donna Karan) uses exactly he same technique. I had cut de pockets in the same fabric, a medium weigh crepe, and i kind of blindingly followed the instructions, actually for nothing since the whole purpose is to hide lining pockets... Oh well, I enjoyed learning a new method, I'll use it when really necessary :)
ReplyDelete