

Good morning, Sew-Along stalwarts. Today is the first day of the rest of your shirts!
Just to review our MPB Men's Shirt Sew-Along so far, we've traced our patterns (Post 1) and cut our muslin fabric (Post 2). We've made pockets and pocket flaps (Post 3), and sleeve plackets (Post 4). We've interfaced and assembled our collar (Post 5). Did I forget anything?
Now we're ready to start putting this baby together.
Our goals today are:
1. Staystitch the neckline
2. Finish outside edge of facings
3. Sew front facings to back yoke
4. Measure and stitch pleat on shirt back
5. Attach back and back yoke
6. Attach front pieces at shoulder
Please use the following text/photos as an addition to the original instructions, not instead of them.
1. OK, before we stitch anything to anything else, we need to staystitch our front facings, shirt front pieces, and back yoke: all the pieces that will become our neckline. We do this to prevent stretching and we do this before anything has been stitched to anything else.
Any edge cut on the bias (curve) is apt to stretch and we want to minimize that. I generally staystitch at 1/8 or 1/4" inch -- any distance that's safely within the seam allowance. It's not ever going to be seen, or it shouldn't.

2. We've interfaced our facings and now it's time to finish the outside edge of the facings. Sarai (on p. 11, steps 2-3 of Negroni shirt pattern instructions) has you finish these by folding the edges under (with WRONG side facing up) twice, first at 1/4" and then again at 3/8" and stitching.

I've mentioned Pam Erny's no-bulk facing tutorial that's posted in our Flickr group. More advanced sewers might want to give it a try.
Keep in mind that bulky edges can show through the front of the shirt so press these as flat as possible. (It may sound sacrilegious, but I ended up serging mine after the fact.)
If you're doing it as per the instructions, stitch the twice-folded edge down.

When completed, they should look

3. Now let's sew the facings to the back inside yoke (you can choose either back yoke piece at this point) - RIGHT SIDES TOGETHER. The real construction has begun! When finished, it should look similar to this.

4. Now let's get our shirt back piece. Place it right side up. We want to create two back pleats. We do this by bringing the small circles we've marked on either side of the top back edge (oh yeah, those) together (You can barely see mine below).

These are outward facing pleats, meaning when we stick our finger under each one, the pleat opens facing the outside edge of the back (as opposed to the center). That's clear, right? If you're unsure about evenness, stick a seam gauge underneath and measure the depth of each pleat. They should be identical and evenly spaced from the edge.

Baste these in place. I do this the same way I edgestitch: in the seam allowance, and just far enough to hold the pleat in place.
BEFORE YOUR BASTE: check your work. Hold the pleated back up against the bottom of the back yoke, right sides together. Do the notches match? They should.
I didn't double check and I had a little bit of extra length on my yoke. Whoops.

I generally press pleats maybe 5-7 inches down the back of the shirt -- enough to define the pleat but not all the way down the back. Whatever you do, make sure right and left pleats are symmetrical.
5. Now with RIGHT SIDES TOGETHER, stitch your back to your other yoke piece (NOT the one you attached your facings to). This will become your outside yoke.
If you're having trouble with creeping layers (where the top layer gets pushed forward more than the bottom layer gets pulled back) as you sew, try stitching from the center out in each direction.
You don't want to start with the edges matching on one end and an extra 1/2" of back or yoke on the other. I generally pin these edges before I stitch, which also helps. You can also use a walking foot if you have one.

6. Now it's time to attach the front pieces to the yoke/back piece, RIGHT SIDES TOGETHER.


OMG, it's starting to resemble an actual garment! Seam allowances should be pressed up and toward the back.
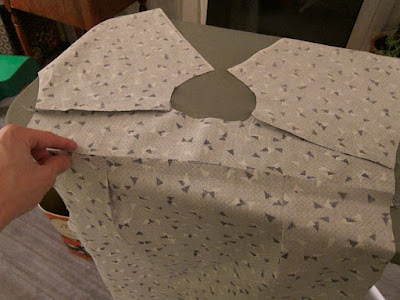

Can you see what you have constructed? The back, outside yoke and front pieces are all attached. Separately, the inside yoke and front facings are attached.
It's nearly time to attach the collar and facings.
But first, the dreaded button loop!
I'm going to cover the button loop tomorrow, actually, and we'll attach our collar together then. You guys deserve a break. Of course, if you want to experiment with the loop today, go for it, and if you get it right the first time, give yourself a hand!
I see from our Flickr group that real progress is being made with a minimum of blood spilled -- though not none. Still haven't joined our Flickr group? It's not too late!
I'll see you bright and early on the morrow.
Have a great day, everybody!


I'm going to have to play catch-up on this sew-along once I get a few other things done, but it is great to see everything coming along!
ReplyDeleteYour first line was delivered brilliantly. Now that I've made two shirts that are not Sew-Along related (and tried your pocket shaping trick!! Fab!!) I think I'll do the muslin today! No button loops on mine, thank the mother.
ReplyDeleteHere is Dallas everyone is celebrating/worshipping the superbowl, so I'm heading to out to replenish sewing notions. :) Have a lovely Sunday!
The super what? ;)
ReplyDeleteA couple of questions.
ReplyDeleteI see you staystitch close to the cut edge. I thought that staystitching should be close to the sewn seam (like staystitching at 1/2" if seam allowance is 5/8"). That way, the staystitching is in after the seam is graded. Though, I can see that it might get snipped in the process of clipping the curves. Is staystitching simply for keeping the pieces from stretching out during construction?
Also, don't most men's shirts have double yokes? Does this shirt not have a double yoke? I'm actually making a ladies shirt with a yoke cut from the bias. Directions show only making one yoke. I decided to make the yoke double so that it would not be so stretchy. Good idea or no?
I should have joined in. Darnit!
ReplyDeleteMr. Goodwill Hunting
Jumping ahead here, but in the course of this sew-along, are you going to cover inserting sleeves so that the armscye seams are enclosed? I am curious and desperate to understand how this done. I would owe you big time if you could teach this. Big time. A black sesame frappe, perhaps?
ReplyDeleteBecky, I've altered the text a bit to clarify: this shirt has an outside yoke and an inside yoke.
ReplyDeleteI've never heard of just a back yoke. What do you do with the raw edges between back piece and yoke? Is there a neck facing?
If you're creating an inside yoke you'll need to figure out how to attach it. For a shirt with a collar stand and collar these are attached one way, for a shirt with a one-piece collar (like the Negroni) where the collar edges are enclosed inside the two yokes, another way. You might want to refer to a sewing reference book.
Rachel, we're flat-felling our armscye seams so they will be enclosed, and we're doing this with the sleeve open and flat, so there's no "insertion."
ReplyDeleteNo whipped cream on the frappe please.
"I've never heard of just a back yoke. What do you do with the raw edges between back piece and yoke?"
ReplyDeleteSerge, press and topstitch.
"Is there a neck facing?"
Only on home sewing patterns. RTW and most sewers omit the facing and stitch in the ditch from the right side to catch the collar. Look at an unyoked men's camp shirt sometime, or a woman's blouse.
* * * * *
I also have a couple of little niggles about the staystitching. It should be done earlier in the process - right after cutting pattern pieces - because the movement from handling the pieces (or pinning them on a dressform!) can distort the bias edge, especially with a looser weave fabric which really needs the staystitching. Staystitching should also be done close to the seamline, so that when the neckline is clipped to insert the collar/stand, you can clip up to the staystitching and not through it, thus retaining the stay properties as you join neck and collar/stand edges. Staystitching close to the cut edge doesn't really stay the seamline. ;-)
Not scolding, just sharing. :-)
Your descriptions and illustrations are excellent but I admit you lost me in the end. Perhaps I wasn't paying close enough attention but I didn't see where the inside yoke with the facings got sewn in.
ReplyDeleteYou do make it look easy...
Thanks, Debbie! Good to know.
ReplyDeleteBryan, that was Step 3. As of now the facings/inside yoke piece is separate from everything else.
Will you be demonstrating how you flat-fell the side and arm seams? I've been scrunching it all up in my machine, is this the only way?
ReplyDeleteYes, we'll be covering that later in the week. If you're flat-felling the sleeve there's no avoiding scrunching up, unfortunately. It's challenging!
ReplyDeleteI had extra length on my yoke too. Hmmm.
ReplyDelete