

Welcome to the MPB Men's Shirt Sew-Along! In the next few weeks I am going to lead you through the construction of a men's shirt, starting first with a muslin and then moving on to our final garment.
I'll be using the Colette Negroni men's shirt pattern primarily, but I will be addressing more formal dress shirt patterns as well. I will also show you how to add a front button placket, collar stand and collar to the camp-collared (i.e. one-piece) Negroni pattern.
If you haven't already, please join our Flickr group, where you can post questions both to me and to each other. We're a large group and I will try to address as many of your individual questions as I can. If I can't answer them, I am confident that someone else will be able to.
Our goals today are:
1. Familiarize ourselves with our pattern and read the instructions carefully.
2. Cut our pattern pieces (but NOT our individual pattern size if it's a multi-sized pattern like Negroni).
3. Trace our pattern in our individual pattern size.
4. Prep our traced pattern before cutting our fabric.
If you get to all these today, great, if not, that's fine too. Please work at the speed that feels comfortable to you.
1. Sarai of Colette Patterns has done a wonderful job providing clear step-by-step instructions for the Negroni pattern. While I may be doing a few things out of order (e.g., I generally add pockets only after the shirt is largely completed) I intend to follow the pattern instructions as written. Some steps may be new or seem unusual to you but I strongly recommend giving them a try.
While seam allowances are generally 5/8", there are exceptions and these are spelled out clearly in the instructions. I like to make a note of them so I don't forget. NOTE: Seam allowances are not printed on the Negroni pattern pieces (with the exception of the sleeve placket).

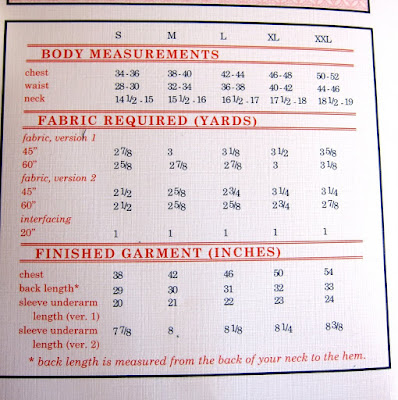
Please review the pattern measurements. Do you know which size you're likely to need? If you're between sizes, Sarai recommends you cut the larger as the Negroni shirt is cut slim.
2. Now we're ready to cut our pattern pieces. I do this with an ordinary pair of scissors, never with my fabric shears.
I do my cutting on the floor. First I lay everything out.

I start with the pieces that are not sized. I will not trace these. They include the pocket, pocket flap, and sleeve placket. (I store all the small pieces in a ziploc bag.) Don't forget the button loop!


Next, I cut my big pieces. Again: I am cutting the entire, multi-sized piece.


After all my pieces are cut, I iron them flat at a medium setting, dry (no steam).

When I'm done ironing, I'm ready to trace.
3. Tracing is straightforward. I'm using yellow tracing paper I purchased at my local art supply store. The roll I bought is 18" wide.

Lay your pattern down and roll your tracing paper out on top of it.

Line up long straight edges.

I use weights to hold the paper down.

I started tracing with pencil and quickly realized I needed something darker. A Sharpie permanent marker worked much better. I traced the Small. I did some tracing free hand, but generally used a ruler and French curve for greater accuracy.
NOTE: Go slow and make sure you are tracing the correct line. A mistake you don't catch now will come back to haunt you down the line, rest assured.


Copy all the information from the pattern to your tracing paper. Include all markings: notches, circles, grainlines, etc. Include the name of the pattern and the size (very important). Include the number of fabric pieces you'll be needing to cut, interfacing, etc.

Then cut your tracing paper -- this is your new pattern moving forward.

Put your original pattern where you can find it if you need to refer to it, neatly folded in a ziploc bag or wherever you generally keep them.
4. Now prep your pattern. I decided, after measuring the length of a favorite shirt, that I could take 1" off the length of the Negroni pattern. This meant altering multiple pieces: the front left and right, the back, and the facings. I also shortened the sleeve 1".

It is best to make these alterations on the "lengthen or shorten here" line.
At this point, having already prepped my fabric, I was ready to cut.
Friends, that's all we're doing today together. If you haven't prepped your fabric yet, do so now. Launder it, pre-shrink it in a dryer, and iron it. You may not feel it necessary to preshrink a muslin. Do iron it flat however.
We'll be addressing cutting tomorrow.
If you have any questions or comments, you may leave them below or in the Flickr group.
Have fun, everybody!


Wow, Peter were you up early?! I took today off work (in the UK) to get my fabric prepped etc, before it all started and you've kicked off already! Fantastic.
ReplyDeleteYAY! It's just like Christmas morning all over again! Happy first day of your sew-along Peter!
ReplyDeleteI'll be watching carefully tomorrow as you cut your fabric with with a rotary cutter! Please include tips on how you do it. I have 2 rotary cutters and dare not cut my fashion fabric with it for fear of slipping. Once cut, you can't undo a slip up!
Do you use weights or pins to anchor your pattern pieces to your fabric?
Bright and early. As another UK-based Sew-Alonger, this is fantastic news and I shall get started immediately!
ReplyDeleteSomething that I like to do with my tracings, especially ones that I know I will use a lot, is to back them with some cheap fusible interfacing. This makes them last for ages and the fuzzy side of the interfacing holds the pattern piece nicely to the fabric while you are cutting (although of course you will still need fabric weights).
ReplyDeleteTwo things I always do: mark the waistline on every piece. For some strange reason the waistline is often marked on just the front piece. I also extend the grainline right to the edge in both directions.
ReplyDeleteYAY we're starting!!!
ReplyDeleteI just have a question regarding lengthening, as my pattern (burda) has a fairly straight hem, but I want to make it rounder so it's better for tucking in. Is there an easy way to do that? Should I do it now or later? And should I have posted this question on flickr instead? :)
Thanks Peter! I'm having fun already and all I've done is read your post!
amelyn
I'm not into this sew-along but I'll definitely follow all posts to get all the tips :) May I? LOL
ReplyDeleteAmelyn, you can do it either way. You can trace the bottom of a RTW shirt you have, or of another shirt pattern with a rounded hem.
ReplyDeleteOn second thought, do it now and get it over with. You'll only have to do it once for the twice-traced fronts, and only half the back since that's cut on the told. Don't forget to lengthen front plackets too.
I also mark the top of the sleeve so I can easily line it up when I sew. And I trace a pocket piece so I can lay it on top of the shirt piece where the pocket goes,trace the design or plaid markings on to the traced pocket pattern piece and then when I place it on the fabric, it can exactly match the front fabric.
ReplyDeleteI think you must be a control freak like me. :) Good teachers are.
ReplyDeleteTo all NPR geeks: John Leinhard of "The Engines of our Ingenuity" chose a perfect topic for the first day of the sew-along. Enjoy: http://www.uh.edu/engines/epi1701.htm
ReplyDeleteCongrats on the MPB MSSA kickoff!
ReplyDeleteSince everyone else is saying what they do, I'll join in. I rough-cut my pattern pieces and dry press them *before* I fine-cut the shapes because the factory-folded tissue often gets creased so unevenly that it affects the cutting line. I also cut them with a rotary cutter and cut off the notches as I go, as I clip inwards into the SA for notches.
I hope you don't mind, but I'll also pick a little nit in the interest of information. A camp collar is not a one-piece collar in the usual use of a the term. A one-piece collar has both the collar and stand combined into — you guessed it — one piece. A camp shirt has no stand, and thus nothing to combine. Here is a linkable reference with photos.
Yay, I am so excited that today's the day! I can't wait to hear about everyone's progress. I am actually not able to start until tomorrow because I have work/class all day, but I am still going to read everything and psych myself up.
ReplyDeleteExciting!
ReplyDeleteI've never traced a pattern already cut to size, only uncut patterns to preserve the original for later size changes, or in case of making too many alterations and needing to go back a few steps. Why trace a cut pattern?
Peter isn't cutting the multi-sized pieces to size, he's only cutting them from the big sheet for easier handling. He traces his size from the multi-sized piece and leaves all the sizes on the original piece.
ReplyDeleteHope that makes sense. :)
Hi Peter,
ReplyDeleteI've started to acquaint myself with pattern instructions and have cut out the pattern pieces. I'm going to iron and trace them ;if I have time today ( medical exam table tracing paper)although I'm not sure if I've enough time to do so. It was a huge relief when you wrote in the post that we could take our time ,it took the "pressure off";in that I work slowly ...OCD ? (maybe)
The photographs and step-by-steps are Great! Thank you so much for all your work in helping and teaching me through this project.
Best,
Elise
So, since I do a TON of costuming, we trace our patterns b/c some are expensive or rare, or we need to use the same pattern for multiple actors. We usually use Pellon Red Dot (http://bit.ly/fr4JHU) which we get either from that link or from Hancock Fabrics (JoAnn does not seem to carry it).
ReplyDeleteWhat a great post, thanks for the tips. I never thought to consistently use a ruler and french curve to aid in pattern tracing! Will have to try that.
ReplyDeletei have my fingers crossed for a snow day tomorrow, so i hope to get everything traced off then (and then my 'client' will also be home for a fitting).
ReplyDeletei iron my pattern before tracing off (just a rough cut to separate the pieces), and, if i would just be cutting my pattern, i don't bother cutting out out ahead of time before laying it on my fabric, i'll cut the pattern and the fabric out at once. i don't worry about cutting paper with my scissors; it's a cellulose fiber, like cotton.
Thanks for the widget thingy code ;/
ReplyDeleteRhonda
The best thing about the McCall's vintage pattern is that there is only one size: no tracing needed! Of course, I still transferred it onto Pellon, like Nikki suggests, because then I can re-use it again and again. And extending the grainlines to the edges is a very good idea, too.
ReplyDeleteThe sleeves on this pattern seem pretty long, even on my fairly tall hubs. Just saying.
ReplyDeleteI agree that the sleeves are longer than I expected. The body is also slim just as noted by Peter and Colette Patterns. My DH is a medium, but the stomach woul dbe snug. Normally I add an inch or so to the sleeve length. May not be required. I traced to 50 cent per yard interfacing(half off at Joanns), but it's only 20 inches wide. I use glass circles from the dollar store (designed for the the bottom of flower vases) for pattern weights. I got pretty clear green ones. Have my muslin, but still waiting on my Italian shirting from Fabric Mart.
ReplyDeleteWhat a wealth of information you have, and amazing people on here to. I am such a beginner, I mean real beginner and I never dreamed that I would be able to have such great teachers.
ReplyDeleteI will follow along and watch carefull and take in all the great advice.
I've had a look at the post and will follow suite soon. We're currently sitting out a bloody big cyclone. Not sure when I'll be able to begin cutting, let alone sewing! Cornelia
ReplyDeleteHi Peter and all :)
ReplyDeleteI disappointed that I cannot participate in the sew-along, but FYI, I posted a tutorial a few days ago detailing a nifty "custom" way to finish the raw edge of the front facing on the Negroni Shirt (or any facing, for that matter) that may interest you...it does involve some pre-planning before cutting. You can find it at the top of the page here at
~Off the Cuff~
Hi, Pam. Someone has already linked to it in our Flickr group. Very helpful!
ReplyDeleteI loved seeing your roll of yellow tracing paper, I thought I was the only one! ;) We call it "yellow trace" in the architecture industry.
ReplyDeleteHi, I have a fright from scissors. i love sewing, I even dream I'm seqing things for my kids and my self. i love your blog everything is so easily explained , you give tons of courage to step up
ReplyDeleteGo for it, Chahraana!
ReplyDeleteHello!
ReplyDeleteVery nice blog. I'll be watching it closely in future. I do mostly re-enactor/historical garb, but considering the availability of some grand fabrics at Fabric Mart (thanks for the tip), I'm strongly considering trying ym hand at mens dress trousers. Got any good patterns, tips, hints, or upcoming projects? I mean why pay major $$$ for dress pants when you can buy Armani fabric and sew your own, right?
best wishes
William S Dean
california_william@yahoo.com
thanks for this tutorial. It helps me big time while sewing my boys' shirt.
ReplyDelete