

Friends, yesterday I discussed how to create a new facing and front button placket for the Negroni shirt pattern. We are turning the casual Negroni shirt into a traditional dress shirt. Now that you know how to draft your right front facing and left front button placket, it's time to address the collar stand and collar.
Our goals for today are:
1. Draft collar stand and collar pattern pieces
2. Attach yokes to shirt using the "burrito method"
3. Staystitch neckline and measure
1. There are a number of ways to draft a collar stand and collar: 1) You can start from scratch and, using various formulas found in books like David Coffin's Shirtmaking, draft your own; 2) You can find a shirt with a collar stand and collar you like, trace these onto pattern paper and add seam allowances; or 3) You can choose the collar stand and collar pieces from a commercial dress shirt pattern you already own.
I am going to focus on #2.
I choose a Brooks Brothers shirt whose collar fits comfortably. I trace it.

There are a few ways to do this. You can use tracing paper and a tracing wheel. I found I had to press down very hard to do this successfully, given the thickness of my collar seams. (Should I have used a needle-pointed wheel?) You only have to trace half the collar and collar stand (We'll cut these on the fold).
The piece you trace may end up being slightly longer or shorter than what you'll need from Negroni, but we'll take that into account when we cut our fabric.


Now I only need to add seam allowances.
Another way to do this is to trace from above with tracing paper and a marker. I found this much easier than using the tracing wheel. Just be sure your pen doesn't bleed onto your shirt, please. Make sure your shirt pieces are laying flat and that you're tracing accurately.

After you're done, compare your traced stand and collar to the original. Is the shape the same? If not, make corrections.
There are a few points you want to mark on collar the stand pattern piece: 1) the center front line (marked cf in my photo), 2) The point where collar stand and collar meet, and 3) the point where collar stand and front placket meet (this matters on the left side more than the right).
For those of you unfamiliar with stands and collars, it might also be helpful to mark on each pattern piece which is the top edge (attached to the collar), and which is the bottom (attached to the neckline).

Now add seam allowances and re-trace.

Another way to do this is to pick a collar and collar stand pattern piece from another dress shirt pattern. Before you cut your stand and collar, however, you'll want to measure the length of your Negroni shirt neckline precisely.

2. Before we can measure the length of the Negroni neckline, we have to construct it. We do this first by adding fronts and back piece (with pleats) to yoke.
Here are my yokes. I cut one on the bias, which will be the outer yoke, and one along the selvage, which will be my inner yoke. (I think this might make for a more stable yoke; just an experiment and not required.)

First I make my back pleats. This photo shows my back piece wrong side up: the pleats from the right side are outward facing.

I then attach my outer yoke. I press seam allowances up toward neck.

Along the same stitch line, I now attach my inner yoke. (Some people attach all three layers at the same time; it can be done.)

Now watch carefully. With RIGHT SIDES UP I lay my back and fronts next to each other. I lift the OUTER YOKE OUT OF THE WAY. I attach my inner yoke to the left shirt front at the shoulder line at a little under 5/8".


Now I'm going to attach my outer yoke to the left front. Here's how we do it. I learned this method from a Margaret Islander video but David Coffin uses a similar method. It's called the BURRITO METHOD.
1. Pick up the stitched seam allowance of inner yoke and left shirt front.
2. Pick up the outer yoke shoulder edge.
3. Bring these two pieces together RIGHT SIDES TOGETHER by encasing the rest of the shirt in between them, thus forming something akin to a burrito. You may need to try this a few times to get it right.
To get those yoke shoulder edges together, you're essentially folding them around the rest of the shirt. Does that makes sense?

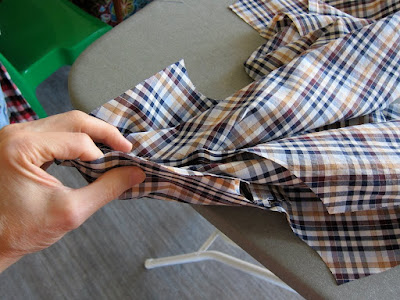

Pin. Make sure the shoulder line you're about to stitch is clear of other shirt pieces that might get trapped inside the seam.

Now stitch this shoulder seam together at 5/8".

Next, turn it right side out.
Voila! Press.

Now do the same thing on the right side.
Remember: first, the inner yoke will be attached to front, with right side facing up. Then you're attaching your outer yoke by capturing the rest of the shirt between the shoulder seam (of inner yoke and shirt front), and the edge of the outer yoke. You're stitching these together RIGHT SIDES TOGETHER and then turning them right side out.
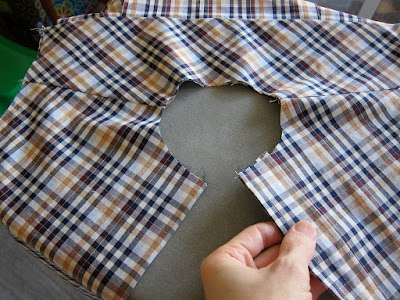
When you are done, staystitch the neckline. You can now measure the neckline for collar stand and collar exactly.
Friends, that's it for today! Tomorrow we'll cut our collar and collar stand, interface them, and attach them to our shirt.
Is all of this making sense? The burrito method is a great way to attach inner and outer yokes with no need to topstitch, and it creates a very clean-looking seam line. If you don't get it the first time, just try it again.
Questions, comments? Just let me know.
Have a great day, everybody!


Great tutorial. I always make my shirts with the 'burrito - method'. Are you going to use the 'toaster -method' for attaching the collar? Another great technique.
ReplyDeleteI love how you're using the bias for one side of the yoke and the straight grain for the other. Please share how that turns out. Your sewing skills are superb! I wish I could get things accomplished as quickly as you!
ReplyDeleteI like your fabric. Can you see the inner yoke through the outer yoke? Would it be better to stay stitch the neck before doing the burrito because the neck might get pulled around?
ReplyDeleteNow why I didn't think of that? I too use the "burrito" method, but sew the back seams of the yoke last and it's a bit of a challenge to sew. I will now do it your way. A teacher once suggested to trim the under yoke by 1/8 to compensate for the fold of the fabric, but it's never worked for me.
ReplyDeleteThank you for this visual demonstration of the burrito method - I needed more pictures than the DPC book had :)
ReplyDeleteThank you for this demonstration. I am going to sew my final shirt this way. Do you think it's best not to trim the yoke-to-back seam, or could you trim or grade those three layers of fabric without causing an obvious bump above the seam? I'm working with a fine wale corduroy.
ReplyDeleteP., I'd see how it feels. Grading would probably work best to avoid any obvious thickness.
ReplyDeleteYou do beautiful work. If any of you are new to making shirts...as I am...what worked better for me was to stitch only 1 of the back pleats....then attach the outer yoke.
ReplyDeleteThe reason I did it this way was when I got to the end of my stitching line...the yoke and the back didn't match...I decided to fold in the last pleat when I came to it...It was slightly smaller than the first pleat...but I was able to match the seams perfectly...
I also follow DPC's "burrito method". Love it. What I do to ensure I have things together correctly is I lay the final yoke piece in place and then gently tuck its seam allowances into final position, then reach inside the neck and pin it in place. Now that it's pinned the way it ought to be sewn, I flip it around into Burrito position and sew as you showed. I do this because getting the pieces flipped about is sometimes confusing, but if it's pinned in the position it belongs first, then it stays in position when I flip it around to sew. :)
ReplyDeleteThe clearest explanation of the burrito method I've found is at https://www.youtube.com/watch?v=S6DMbrpfvSg . You can see where the "burrito" comes from.
ReplyDelete