

Friends, one of the alterations I need on nearly every commercial shirt pattern I use is a sloping shoulder adjustment. See that big diagonal crease running from my left shoulder to my left armhole? You'll see it on nearly all my shirts, on both sides.
Most men's shirt patterns are drafted for a squarer shoulder than mine. My shoulders are also slightly rounded forward.

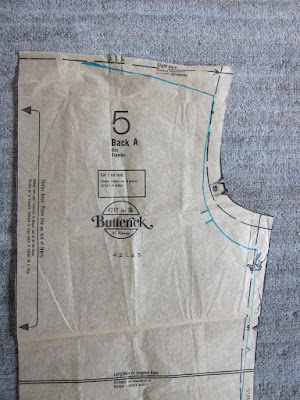
In the first photo up top, I'm wearing one of my many versions of a favorite vintage pattern from the Seventies, Butterick 4712. I really wanted to adjust this pattern to fit better.

Now it's very difficult to address fit on oneself. I have had the privilege this month to work with the esteemed designer, teacher, writer, and fellow flea market devotee, Kenneth King. Kenneth recently contributed a series of articles specifically on fit for Threads in 2010.

I wore my shirt to Kenneth's studio, which is just about a mile from my apartment, and brought my pattern along too. Kenneth immediately recognized my primary fit issue. He pinned out the deep diagonal crease on my shoulder to form an elongated, marquise diamond-shaped dart, whose width he carefully measured and transferred to the armhole. The shoulder is subsequently lowered the same amount.
This extra fabric becomes what Kenneth refers to as a "net loss." In other words, that extra fabric is being eliminated from the pattern.
The method he used is described in his article, "A New Approach to Fitting," from the February/March 2010 issue of Threads.
It's a wonderful article. Here's a quote you may find helpful:
"To start this process, make a muslin, put it on, and begin to pin out any fullness and unevenness to form a nice smooth silhouette. For garments that hang from the shoulders, adjust the muslin from the top down, as lower drag lines often disappear or diminish after the upper adjustments are made."

I want to share the alteration Kenneth made to my shirt pattern, one you can do yourselves, through Kenneth's method or others. These kind of sloping shoulder, rounded shoulder, narrow shoulder adjustments are described in every fitting book, including Fit For Real People, which I featured yesterday.
One note: FFRP suggests that any sloping shoulder adjustment made in back must also be made in front -- at least as I understand the photo on p. 160. Kenneth maintains that the adjustment should be made only where it's needed. To paraphrase: if you have diagonal creases (like mine) in back, address those. If you have diagonal creases in front, address those. If you have both, make the alteration in both front and back.
Remember: Shoulder and armhole are adjusted equally here.
Some detailed shots below. The size of the armhole doesn't change, nor does the yoke or front.


To compensate for the loss of length in back, he added additional length to the back piece so the back wouldn't be longer than the front.

My next goal is to make a new version of the shirt with the altered pattern and see what else -- if anything -- needs to be done. You may need to make a few muslins to work your fit issues (think art, not science). Even a master doesn't always get it on the first try, especially when multiple alterations are necessary, each one affecting the next.
As always, you can bring your specific fit questions to our increasingly colorful Flickr group, and we'll try to work them out.
Have a great day, everybody!


You and Kenneth King thrifting together? How awesome is that?
ReplyDeleteI'll be interested to see how your one-sided shoulder alteration works out, since in my linear brain a shoulder is a front and back deal. But maybe the yoke makes up for it and in a non-yoked shirt you would have the wrinkles both front and back? I don't know. I'm tired and my brain isn't fully engaged. Carry on. ;-)
Really very interesting and useful. I've had to re-read your post a few times but I think I've got my head around the explanations! So if my understanding is correct, with a yoked back like the top one, you raise/drop the shoulder seam on the yoke, but leave the bottom seamline of the yoke untouched. You also leave the seamline that connects the back to the yoke untouched, but you raise/drop the armscythe line on the back piece and lengthen/ shorten the bottom if necessary... Did I understand that correctly?
ReplyDeleteIts usually an issue of shoulder width and back waist length I think. I love Kenneth King
ReplyDeleteOh man, you got fitted by/hung out with Kenneth King? Now I'm really jealous. The man is brilliant.
ReplyDeleteI so wish he'd been at FIT when I was there several years ago. I've always been a fan.
Nathalie,
ReplyDeletePeter didn't do anything at all to the yoke piece. All of his alterations were to the torso (back) piece.
I love that photo :-) And thanks for the details on that alteration. Sometimes I find Kenneth's instructions to be scary for the detail, but this somehow demystifies...
ReplyDeleteDebbie,
ReplyDeleteYou are absolutely right... I thought it was a full back piece (i.e. without a yoke). I was clearly too engaged with trying to understand what was going on to actually look at the picture properly! Ok, now I really don't understand how it works... I mean I get the theory, but doesn't that just make the yoke look all wonky?
Natalie, maybe this will help:
ReplyDeleteThe slightly rounded, sloping curve in the photo of the back (the pic with the number 5) removes much of the extra fabric that now was creating a big crease. It's in the seamline between the back and the yoke. The yoke stays intact, but it has the effect of lowering the shoulder slightly.
Since that seamline was brought down, so too much the armhole on the pattern.
Or think of it this way: if you put a big shoulder pad on my shoulder that crease would disappear. Without a shoulder pad the yoke still lies flat on my shoulder, but the extra fabric that appears beneath the yoke is causing a crease.
ReplyDeleteIn theory, one COULD make the change by narrowing the yoke, but we want the shape of the yoke to remain constant.
Thanks Peter, but the thing I'm not getting is that if you remove fabric from just beneath the yoke, it'll pull the yoke down at the shoulders, but won't it also make the bottom bit droop at the sides and no longer sit in straight line across the back?
ReplyDeleteWow, a personal fitting by Kenneth King--the heart positively palpitates at the glamorousness of it all!
ReplyDeleteNathalie,
ReplyDelete"but won't it also make the bottom bit droop at the sides and no longer sit in straight line across the back? "
Laying flat or on a hanger, yes. But on Peter's body, no. The only visual change that will occur while he's wearing it, is the extra folds of fabric will be gone.
The "hanger appeal" is one reason why RTW fits so badly. Many shoppers wouldn't even try on something that hangs crooked on a hanger, even if it would actually hang beautifully (and straight) on their particular body. Manufacturers strive for hanger appeal - so that the item is picked up and then bought, esp. since most customers don't know good fit from bad. If they can button it, zip it, or pull it past their hips, they're sold.
Nathalie, I think you're picturing how the shirt pattern would look on someone who fit it perfectly. But it doesn't, so minor compensations must be made.
ReplyDeleteAll the alterations we're making should result in the shirt looking balanced and well-fit on ME. I'm the one with the droops on whose body the shirt doesn't sit straight! ;)
We're adjusting this pattern to my various curves and unevenness, which aren't factored in the original pattern (which is based on someone with the ideal measurements).
Exactly, Debbie. Well explained.
ReplyDeleteThank you Peter and thank you Debbie.
ReplyDeleteI'm afraid my brain does not compute when it comes to spatial awareness but I do think I've got it now...
Interesting what you say about the RTW hanger effect. I'm always appalled at how terrible the dresses I make look on the hanger yet manage to fit me so much better than shop stuff! Now I know why...
That's why I just throw all my clothes in a pile. ;)
ReplyDeleteNice try, Peter. ;-)
ReplyDeleteNathalie - my clothes look horrible on a hanger. Yep, that's the exact reason - we're not the hangers the RTW makers design for.
Thank you Peter and Kenneth!!! This is helpful in so many ways for both men and women. I can't wait to get my next Theads issue, it's always a few weeks behind.
ReplyDeleteI remember years ago, seeing Kenneth King on Sandra Betzina's TV show, and one thing he said stuck in my mind. He basically said what you wrote here, which is that you only need to pinch out the wrinkles where needed, and then add back length or width where needed to compensate for what you took out. And I remember him saying something like, "It doesn't seem like it should be that simple, but it really is."
ReplyDeleteI learned a lot from working through the FFRP book, but I don't consider it a great fitting method. I think they make things more complicated than they need to be. Or at least it seems more complicated than what I've learned to do after learning basic pattern drafting.
That's a really useful tip. I always make a narrow and sloping shoulder adjustment. (The two interact in fact.) But, by luck I guess, so far I haven't done one on a shirt with a yoke. But I have a pattern with a yoke in the queue so I will fit it there if needed. Thanks.
ReplyDeletePeter, please consider hosting a men's jeans sew-along later this year. You are an amazing teacher, and I have learned so much from the conversations here and on flickr. Plus, the jeans you've sewn in the past look great!
ReplyDeleteMy husband and I are going to brave this sew-along sometime in the next few weeks! I am excited, we are both trying to learn to sew!
ReplyDeletehttp://lovedredays.blogspot.com/
Great, Andrea. Welcome aboard!
ReplyDeleteI've finally worked out why i can't find a shirt that fits me, or any kind of jacket - my arms are further forward than "normal". Shirts are always tight across my back and loose across the chest. Any suggestions on best way to adjust a pattern to move the arms forward?
ReplyDeleteTry looking for a person who can make a shirt using the adjustments for a forward shoulder which would mean that the top of the sleeve needs to be rotated forward to make the ease equal. Good luck.
ReplyDelete