

Friends, it may seem hard to believe, but we're now in the final portion of our Men's Shirt Sew-Along, which started February 1. I can't remember when we weren't sewing shirts together. Which reminds me -- Have you started yet?
First we learned how to construct the Negroni shirt according to the original instructions, and created a muslin, or for some, a very wearable practice garment.
Next, I showed you how to turn the Negroni shirt, which has a one-piece camp collar, into a more traditional dress shirt with collar stand and collar and front button placket.
Finally, we reviewed some basic alterations, which we'll continue today as I begin my third and final version of the Negroni with my new floral fantasy fashion fabric.
This last Wednesday I talked about the alterations Kenneth King guided me through to address a sloping shoulder, using my vintage Butterick men's shirt pattern, 4712.
Today, I'd like to share the alterations we made to the Negroni pattern. The overall fit of the size Small wasn't bad, but the shoulder seam was past my true shoulder -- a common problem, I'm noticing -- which is the pivot point at the top of the shoulder. We narrowed the shoulder width -- which meant making changes to the front, the back, and yoke, AND the sleeve.

In the photo above, the area of shading is the portion of the old shoulder seam that will be transferred to the sleeve cap -- this is what Kenneth refers to as "no net change," i.e., no actual fabric is being subtracted, but rather transferred to a new area. The new seam line is marked in purple and blue (to which a seam allowance will be added).
Now look at the new sleeve:
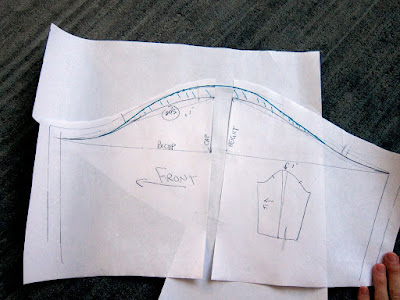
The shaded portion is what was transferred from shoulder to sleeve cap.
Look at the difference in the width of the yokes -- the new yoke on top, the old yoke below.

A subsequent change was to raise the armhole slightly, based on my preference.

This resulted in a narrower armhole and meant shortening the sleeve circumference, which we did by slicing the sleeve piece in the center and lapping one side over the other until the measurements were roughly equal, with 1/2" extra length in the sleeve as ease. Retraced it looks like this:

We'll see how this turns out.
I am now working on my new version, and I invite you to follow my progress here. The photos may serve as a reminder of how the Negroni is constructed and provide new views of some of the techniques we used in making our muslin.


Friends, that's it for today. As always, there are exciting new versions of Negroni, as well as shirts made from other patterns, appearing daily in our Flickr group. If you have questions about fit, please post photos of your muslins there.
In other news, bouffant dress fans will be happy to hear that I was able to snag another four yards of my $2/yd. rose print (which makes seven all together) which should be more than enough for a poofy party dress for Cathy or play clothes for the the entire Von Trapp family.

Have a great day, everybody!


"or play clothes for the the entire Von Trapp family." OH, Peter!! How you make me LAUGH!!!
ReplyDelete;) Rhonda
That rose fabric is totally gorgeous! Yum yum.
ReplyDeleteWhen I sew mens shirt and jackets, I'm making them for the stage...so a slightly different set of fit requirements. I always have trouble with bringing the arm scye up (for better mobility) without narrowing the sleeve too much through the bicept. Any ideas? I know...it's a wierd problem. lol
$2/yd for that rose fabric! I am so green with envy...
ReplyDeleteNice clear pictures of the armscye adjustment. Just one question though - after redrawing the armscye curve on back/yoke/front, KK transferred the new curve to the sleeve, but in the next photo, it appears as if he did so by splitting the upper sleeve (widening it) and drafting in the additional curve. This would have the effect of creating extra blouse in the upper arm. I'm not clear on why this way - did he give a reason(s)?? Great tutorials, I must say though...
ReplyDeleteI would like a summer dress out of your shirt fabric. I'm not sure I'm bold enough to wear that rose fabric, but at $2 per yard, I don't know that I'd refuse to try, either...
ReplyDeleteAren't bargains glorious? It will make the dress ever so more attractive and wearable!! I think it makes sewing a game also. I love to get mystery boxes of fabric. They end up being inexpensive and SEW much fun. I get to make things I never dreamed of...
ReplyDeleteOkay where did you snag that rose fabric? I love, love it. I'm very jealous of Kathy.
ReplyDeleteHi Everyone...
ReplyDeleteOkay, I am a very novice sewer...but finished my dh's shirt. Will not post a pic because just too ugly.
I have learned alot though. Just one question please...
The shirt seems to want to fall to the back on him...any ideas? It is like I need to tug on it at the top of the neckline and pull it forward... Hope you can help.