

Readers, there's an old show business adage: Leave them wanting more. In that spirit, I have decided that today we will formally end the MPB Men's Boxers Sew-Along.
Today, I'm going to show you the second pair of boxers I completed, which is, aside from a few minor differences, very much like the first. Once again, I used McCall's 3438, my vintage Seventies underwear pattern. If you can get your hands on this pattern, which does show up on sites like eBay and Etsy with some frequency, I highly recommend it. For my body type, it's ideal.

This time, I decided to make View C (the light blue shorts second from the right) which has a plain hemmed bottom with a side vent.
You can see the difference between the two patterns here. My earlier pattern, with the rounded leg, is on top, and my current pattern on the bottom. They're nearly identical.


I started making these on my Kenmore 158.141 zigzagger before realizing that I could get far superior results on any of my straight stitch machines. This is because turning curves and topstitching are much easier to accomplish on a straight stitch machine, and you never have to worry about your fabric getting sucked down into the needle hole.

I made these exactly the way I made my earlier striped boxers. Here's how I finished the inside of the right fly facing. I decided not to add a separate facing after all.

Here's the fly from the outside.

I flat-felled all my major seams. I noticed that some of you are using a mock flat-felled seam and serging your inside raw seam allowances. Totally fine.

This time I used a very soft woven elastic that I could only find in black at Daytona Trimming on West 39th St. (They didn't have waistband elastic this soft at Pacific Trim, and the prices seemed much higher there.) I paid about $1.25/yd.


Here's the finished vent, which I completed after hemming the legs. I did both by just rolling up the hem 1/8" and then rolling again roughly 1/4" and edgestitching. Nothing fancy. A bar tack at the top of the vent will make the top of the vent point stronger, if you care to add one.

Here are the finished boxers, which couldn't be more comfortable.
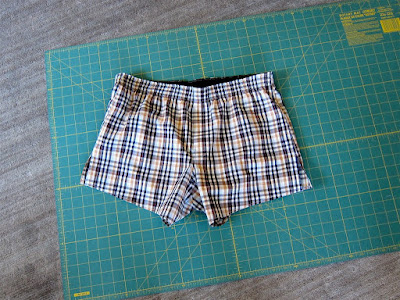
I love my new boxers -- in fact, I'm wearing them as I write this! (You can see the other pair of boxers I made here.)
If you haven't posted your finished boxers in our Flickr group yet, please do. I'm very impressed with what I've seen so far. Great job, Sew-Alongers! I'll still be answering boxers-related questions there too.
On an unrelated note, after debating what to do with my old stereo equipment, I decided that I was not ready to ditch it. But since I don't have -- or want -- large speakers anymore, I will compromise, and listen to my records on my stereo headphones. That way I can still enjoy my old records, collected over more than than two decades, without annoying Michael.

How lovely to reconnect with Vic Damone after all these years!

And that, friends, is that.
What's next here at MPB? Tune in and find out!
Have a great day, everybody!


Good decisions! I made 5 pairs of boxers and loved the learning experience. Thank You!!! Now I'm ready to move on to another project.
ReplyDeleteI'm also very ready to move on from the monolithic stereo speakers that dominate our living room, but that falls in my partner's realm of ownership/appreciation, so I must bear with them.
I can hardly wait to see what's next at MPB!
Great boxers! I see you've used an OOP pattern, can you recommend a current pattern for boxers? At least a source to purchase a boxer short pattern. Thanks!
ReplyDeleteI vote to keep your stereo and speakers. Everyone needs music and what if you have guest over that like Vic Damone?
ReplyDeleteLove love love Vic Damone--such A CARESSING voice.
ReplyDeletePeter,
ReplyDeleteCan we please have a genuine MPB book review of Ms. Shaeffer's most recent contrbution to couture literacy?
Testosterone
Boxers look great, mine didn't come out so great so I'm a bit reluctant to show them off, but might have another go...
ReplyDeleteDoes that kenmore have a flipping straight-stitch/zigzag plate? Sad if it doesn't - my 158.17030 does, and it's just a quick flip.
ReplyDeleteHey Peter,
ReplyDeletemany thanks for spear heading this project. Made 3 boxers (posted on MPD under kaiomygadd) but I cheated and used the serge and mock felled seams for my finishing
I note you used straight stiching to attach the elastic to your boxers .. what stich lenght did you set your machine on?
I used the zig zag stich on mine but yours has a better finish I could apply to another boxer shorts in the making.......
Perhaps we could have waistcoat sew along..... perhaps....
Boo Hoo, I missed the boat on the jeans sew-along and this one too. I finished the jeans way after the end, they're great. Now I'll have to finish the boxers-turned-into-pj's without joining in the fun of showing them on flikr. Hope there will be a sew-along project that will inspire me to keep up. I like the idea of a coat!
ReplyDeleteThanks for the sew-a-long Peter - I thoroughly enjoyed it. I would never have expected to learn so much from a simple garment - never again will I underestimate the simpleness of self-made bias tape!
ReplyDeleteDid you use felled seams for the side seams of this pair? If so, how did you make the vent? I'm working through making a pair for the boyfriend without a pattern and am having small spots of trouble, though your sew along has been amazing.
ReplyDeleteYou only flat-fell up to the vent point. Below it you make a rolled hem. So you'll have to clip the seam allowance at that point. Hope that's clear!
Delete