
Friends, we've almost completed our first pair of boxers, do you believe it?!
I realized yesterday that we never did sew up the crotch seam together. This is a very important seam to complete (for obvious reasons) and it should be done before any bias trim is added. The seam extends from the bottom of one leg to the other. I used a flat-felled seam (see Post 3 for an explanation of how to make one).
In this pic, it's the horizontal seam running left to right (the vertical seam runs up to the fly).

Now let's finish up for real:
Our goals for today are:
1. Measure length of elastic waistband and stitch ends together.
2. Divide elastic, pin to boxers and stitch.
3. Turn elastic to inside and stitch four (or how ever many you prefer) rows of parallel stitching.
1. If there's one thing I can't stand, it's a tight waistband. Cut your waistband elastic to your preferred length, and stitch the band closed, leaving approximately 1/2 inch seam allowances. You'll want the seam allowance to end up on the wrong side of the elastic (and finished waistband), so if your elastic has a right and wrong side, make sure you stitch this seam with right sides together.

2. Here's how my McCall's 3438 pattern has me attach the waistband: first I divide the elastic in quarters, and mark each quarter with pins. I then pin my elastic to the top of my boxers -- wrong side of elastic to right side of boxers -- lapping the elastic 3/8" over the top edge.

Remember that you're going to have to pull the elastic taut to pin it in place and when you release it the shorts will bunch up. Be patient. This is the hardest part -- for me, at least -- of making this kind of waistband (as opposed to making a casing and running the elastic through it).

What I found helpful was to pin the elastic to my boxers at six or more points (pin vertically so the pins don't pop out when you stretch the elastic like mine did), making sure that the "pull" of the elastic is roughly the same between pins. If it isn't, you'll have uneven bunching, i.e., more gathers in the back than in front (or vice versa).
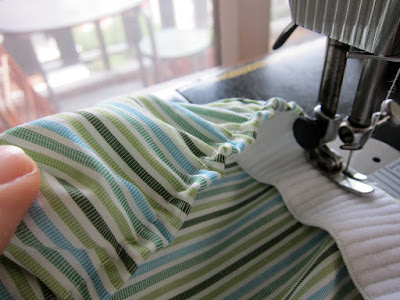
Place your elastic band seam at the center back. When you're comfortable with your elastic placement, stitch along the bottom edge, stretching the elastic between the pins as you stitch.

Some machines have an easier time with this than others. Make sure that as you stitch, the elastic is pulled taut on either end, but let the feed dogs move the elastic away from you.

3. Next, you are going to turn the attached elastic to the inside of your boxers. Leave about 1/8" of fabric visible above the folded elastic. This way, the top edge of the elastic won't peek out over the outside of your boxers.

Now stitch along the top edge, the bottom edge, and through the center. I actually divide the width of my band in quarters, sewing four parallel lines of stitches. You'll want to pull the elastic taut as you stitch, just as you did in Step 2. Since the elastic is already attached to your boxers, however, this is much easier. I sew my last two lines of stitching from the right side (outside) of the waistband; it's easier to see the white thread.


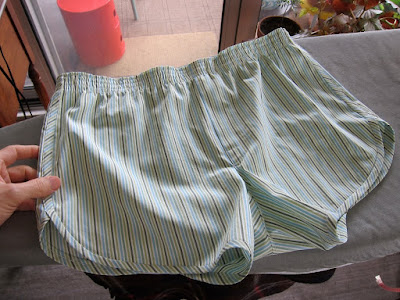
Friends, we are now done! Make sure there are no hanging threads anywhere and check your work. How do things look?
I love my new boxers!


One of the things I like most about this pair is the trim cut. Since I stopped wearing my sagger jeans, I like a slimmer look.

Readers, we may be done with these boxers, but the MPB Men's Boxers Sew-Along continues.
I'm going to make a different style of boxers next, and maybe another pair after that. Once I'm warmed up, there's no stopping me!
Here's a sneak peak of what's ahead:

Some cool-looking boxers are showing up in our Flickr group. Have you posted yours yet?
Have a great day, everybody!


WOW you look sooo happy! I love your smile. Thanks for all the great pictures
ReplyDeleteNice! I like your waist treatment rather than making a casing, etc. It looks more RTW. I plan on sewing up a few boxers this weekend.
ReplyDeleteIn my experience, RTW boxers rarely have casings. Good luck with them!
ReplyDeleteThanks so much for this. I received my pattern this week (the First Choice 5 panel boxers recommended by a commenter recently on your blog) and I'm waiting on some fine red plaid shirting from Hotpatterns' Etsy store to arrive, which I'm hoping will be a fine and soft enough texture. I don't fancy using quilting cotton - some of those are very scratchy and stiff :) If I get them done in time, they will be a birthday gift for my husband.
ReplyDeleteNicely done. They look RTW.
ReplyDeleteHOT! :)
ReplyDeleteMy goodness, I have so much catching up to do. I was so swamped with work this week that I was unable to work on the sew-along!
Saturday should be good. I'm hoping my partner would LOVE his new pairs of boxers!
I'm totally behind too. Haven't even cut them out yet! Got some really cute pink, white and brown plaid cotton with lycra. It's preshrunk and pressed. Took care of the grand-baby all day, so no sewing done here.
ReplyDeleteThe finished boxers on Flickr are so cool. I hope I get to work on mine in time!
Just got my pattern, so I'm behind the schedule, but I do plan on starting some boxers tomorrow!
ReplyDeleteHelp! The elastic in my waist band stretched waaay too much from the 4 lines of stitching I used to attach it. It is stretched almost to its limit. Did you have any trouble with this? (LM)
ReplyDeleteWhat a great sew-along! Well done.
ReplyDelete