

Good morning, Sew-Alongers and Sew-Along bench-sitters! I don't think I told you yet, but I'll be sewing two pairs of jeans in our Jeans Sew-Along: white denim jeans with a zipper fly and dark blue denim jeans with a button fly.
I've been wanting white jeans for a while now even though I'm a bit of a slob. We'll see how that works out. Do you like men in white jeans?
Today I want to focus on seams. The Kwik Sew 3504 pattern instructions calls for most seams to be double-topstitched rather than flat-felled, so I thought I'd show you the difference. First, though, today's goals.
Our goals for today are:
1. Having made our pattern adjustments, start cutting our fashion fabric.
2. Choose and cut pocket fabric.
3. Practice our jeans stitches: flat-felling or double-topstitching, overcasting and/or serging seam allowances.
****
1. It's time to start cutting. I know some of you who are between sizes (e.g., Small and Medium) aren't sure which size to cut. I'd always err on the side of too large. You can always make modifications as you stitch and try on; you can't make something larger if you've cut it too small.
IF you're using stretch denim, however, and prefer a snug fit, you may prefer to cut the smaller size. The first time sewing with a new pattern is a journey into the unknown to some extent. That's why we make muslins. BTW, to make a jeans muslin, all you really need to make is the equivalent of shorts. It's the fit from waist to thigh that needs precise fitting. The only adjustment I've made is to shorten the rise by 1/2". I'm keeping my fingers crossed.
Having pre-shrunk my denim, I ironed it. Remember when I said my denim had no stretch? I was wrong. This denim has some lycra in it and I'll just have to deal with it. If you're sewing stretch denim, try not to stretch it as you sew or the seams won't lie flat.

IMO, it's not worth trying to cut two layers of denim at the same time -- the bottom layer too often ends up off grain. It takes just a few minutes extra to cut all the layers separately; there aren't that many pattern pieces with jeans.
What's nice about denim is that you can generally find the grain very easily and line up your pattern piece accordingly.

It took about an hour or so, but I got everything cut out. (I use an Olfa rotary cutter and self-healing mat on the floor.)

2. Yesterday I also chose my pocketing fabric. I'm using a leftover piece of shirting from the Men's Shirt Sew-Along -- sturdy, quilt-weight cotton. For jeans pockets I usually use shirting, either 100% cotton or a blend. I avoid flannel, which doesn't hold up as well, in my experience. Whatever fabric you choose, remember to pre-shrink it (a good steaming may do the job if you don't want to do laundry again).

3. Now, on to stitching. We've been discussing denim/topstitching thread in the Jeans Sew-Along Flickr Group. For those who aren't familiar with it, topstitching thread is thicker than regular thread and (arguably) sturdier. Sometimes topstitching thread requires a sewing machine tension adjustment and we'll be talking more about sewing machine tension this week. I'm always surprised by how many sewists are terrified of adjusting tension on their machines. We need to get over this fear, my friends.
I'm going to serge most of my exposed seam allowances, and I changed the thread color and tested this out yesterday. All good. If you're not serging you'll want to overcast with a zigzag stitch along the raw edges of your seam allowances.

Now let's talk topstitching and flat-felled seams.
Remember how, in the Men's Shirt Sew-Along, we sewed our flat-felled seams with the fashion fabric right sides together? With jeans, we're going to do just the opposite: we'll be stitching our seams with the fabric WRONG SIDES TOGETHER. This is because we want the bulky side of the seam to appear on the outside of the jeans and not the inside. I flat-fell the inner leg seams, all the seams attaching the back yoke, as well as the seam down the middle of the seat. The outer leg seams I just stitch normally. If you inspect RTW jeans, they're generally done this way.
Kwik Sew 3504 does not call for flat-felling, but rather directs you to double-topstitch. A double-topstitched seam is sometimes called a "mock" flat-fell. From the outside, it is virtually identical to a flat-felled seam and it's very sturdy. Here's the difference:
To create a true flat-fell, we're going to stitch our fabric together, WRONG SIDES TOGETHER, with our topstitching thread (or denim thread; I use these terms interchangeably). I use a medium-longish stitch for topstitching as I like the way it looks. If your not sure which stitch length to use, examine a pair of RTW jeans.
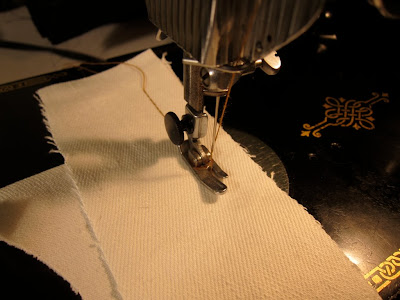
Now separate the two pieces and finger press. You should have two 5/8" seam allowances, right side up.

You're going to trim one seam allowance to approximately 1/4". You can do this with shears or a rotary cutter. Which seam allowance you choose to trim depends on which way you want the finished seam to lie. The seam attaching the back of the pants to the back yoke, for example, generally folds up toward the waistband on RTW jeans.

Now fold the longer side over the shorter side, encasing it. You can iron the seam flat if you care to.

Topstitch along the edge at approximately 1/8". Be careful not to fall off the seam edge! If you need better control on a zigzagger, you can use an edge guide foot if you have one.

Finished, it looks like this on the right side:

And like this on the wrong side. There are no exposed seam allowances to finish.

Now let's do a double-topstitched or mock flat-felled seam:
I sew my fashion fabric pieces together RIGHT SIDES TOGETHER -- the opposite of what we did for the true flat-felled seam. This seam will not be visible.

Now open your fabric wrong side up, and finger press, folding both seam allowances to one side. Next, turn your fabric right side up and topstitch along the seam, on the side which has both seam allowances folded beneath it, at approximately 1/8".

Then stitch a second line of topstitching, 1/4" from the first.

Right side up it looks identical to a flat-felled seam.

Wrong side up you have two seam allowances folded to one side. You can serge or overcast these to prevent fraying.

Again, from the outside, these seams look identical. If you find trimming flat-felled seams too challenging or labor-intensive, or if your fabric is too thick or spongy to handle it, do the double-topstitch. It's your call. When I made my leopard-print cotton velvet jeans, I double-topstitched.

Decorative seams like those along the pocket edges should be double-topstitched of course: flat-felling is not an option.
Friends, that's it for today. I hope this is clear. If you have any questions about these techniques, just ask. Tomorrow we'll start sewing for real.
Have a great day, everybody!


I am not sewing along right now (I am waiting for a high waisted women's jeans pattern to come out.), but this is all great stuff. I hope you will leave all these posts up for us to refer back to over the years!
ReplyDeletePeter , that was incredibly clear, why did I buy a flat felling foot? How did you learn all of this amazing stuff in 2 YEARS?
ReplyDeleteYay! I remember someone mentioning that a fabric gluestick (the kind that washes out) is uber-helpful for uncooperative flat-felled seams. So I bought one. Anyone already worked out the details of where to apply it effectively?
ReplyDelete@Karin-you might check etsy--there's lots of high-waisted jeans patterns from the 70s and 80s on there! Vogue also has a "sandra betzina" jeans pattern that hits the natural waist, I believe.
ReplyDeleteQuestion: On a pair of good-quality (but worn out) RTW jeans I sacrificed to the cause of learning, I noticed that the "flat fell" wasn't really a flat-fell, but rather more like the two pieces had each been folded under a shy 1/4" in opposite directions, and the raw edges bumped against each other and topstitched down. That is, there was no underlying construction seam, only topstitching, and at no point were there more than 3 layers stacked. Is this some sort of industrial construction that we can't duplicate? (or shouldn't, with our weaker thread?) It seems like it'd be a good thing, minimizing the layers to sew through, but I've never seen any discussion on it, even in the extensive patternreview jeans sew-along threads. Thoughts?
Just a dumb question from the bench: won't that shirt fabric for the pockets show through white jeans?
ReplyDeletePeter,
ReplyDeleteWhat about seam intersections? Do we need a Jean-a-ma-jig, or something to conquer these?
Testosterone
Scooter: That seam was an industrial flat-fell, as made by a specialty sewing machine so that the seam could be constructed in one pass -- a savings in labor for the manufacturer, and in money spent on the laborer's paycheck. Far easier for a home sewist to sew, fold and topstitch than to find an old industrial machine (if that's even possible!) or a probably-nonexistent attachment for your home machine. I used to work for Blue Bell Inc., in the Wrangler print advertising dept.
ReplyDeleteGreat tips Peter and very clear instruction, thanks. I am still on the bench (but following along) as I am completing another project, but I have washed/dried my denim and plan to cut out the pattern today. I like true flat-fell seams so I will apply those.
ReplyDeleteI've seen instructions for that type of flat fell seam on David Coffin's shirtmaking DVD. I'm already behind, but have pulled the pattern and found my two pieces of denim.
ReplyDeleteSusan, the whiter (lighter) side of the pocketing fabric is what's going to be exposed (on the inside of the pants); the darker (right) side will be inside the pocket. The denim is quite thick though, so even a darker fabric shouldn't show through.
ReplyDeleteTestosterone, don't buy a Jean-a-ma-jig or whatever they're called, just fold up a small piece of cardboard. That should work.
Very clear instruction. I just don't know which method to use. Ah, choices...
ReplyDeleteGood to know. I'm going slower as I managed to lose my denim (shocking, I know. It's probably somewhere in the black hole... which is otherwise known as my sewing closet) and I got a new niece yesterday morning so have had Evie since 4:30 am yesterday. I ordered more, but it's not here yet. As soon as it is, well, my pattern is traced and I already know what I'm using for the pockets, and I have the ribbon for the bottom located and the Cookie Monster patch ready to go.
ReplyDeleteThanks, LinB, You confirmed my suspicions about an industrial process.
ReplyDeleteI've always been a little frustrated with my denim flat-fells because the fabric's so thick it pulls a little bit from that first construction seam, and doesn't make the flattest fell. I've thought about basting, topstitching on the far side first, then removing the basting, and topstitching on the near side to mimic that professional finish. Hmm. Time to make some samples!
Aye, great instructions! Since you are sewing jeans, mind if you can give us some tips on how to get those thick overlapping joins and folds under the presser foot and avoid skipped stitches? Sometimes I have so much thread jammed underneath, I simply give up and just go buy a new pair of jeans instead...which is so difficult to get a good fit and expensive too!
ReplyDeleteLaura, some people hammer their thick seams flatter. Obviously, there has to be enough clearance under the presser foot or you're going to run into problems. I recommend going slowly and if necessary, using the hand wheel and walking it through, stepping lightly on the pedal. Not all machines can stitch through six or more layers of denim easily.
ReplyDeleteCongratulations on the new niece, Bratling (Laura)!
Great tips Peter! Looking at your pictures made a light go off in my brain!!! My first pair of jeans I made this winter I used the double topstitch method, but now after reading this I realized that it's a LOT more work than the true flat-fell seam. I did this: 1) serged edges of ALL pieces before assembly, 2) stitched seams, 3) double top-stitched the various seams.
ReplyDeleteNext pair will be made with flat-fell, then I don't need to bother about serging the edges that will be flat-felled, and I'll eliminate the first seam! Save thread, save time!
Thanks!
You can also use your fabric folded to the same thickness in place of the jean/humpjumper.
ReplyDeleteI haven't started yet because I am still trying to figure out the fitting issues with my unleavened back side. I know I need to narrow the legs and redraft the curve......I will be muslining along with you all!!
Steph- only serge the pant edge that will be the top layer. Trim the underlayer to reduce bulk, so you are only topstitching through two layers not three. Old Navy uses this sort of construction on the RTW I have here in the house.
ReplyDeleteAlso, Peter, you are using 3 thread serging stitch not 4, correct?
Good tutorials, Peter! I learned to do flat felled a year or so ago. It isn't difficult, just requires careful sewing - like you said, beware of falling off the edge!
ReplyDeleteAnother excellent post, Peter! The guy on the photo looks awesome, and so will we in our white jeans. I also bought some white and dark blue denim, although my partner said that the white denim will be in the washing machine most of the time. Who cares?
ReplyDeleteI agree on the comments about the industrial inside leg seam on RTW jeans. It is definitely not a flat-felled seam, at least on the jeans I was able to check this afternoon.
I think it is an excellent idea to make the flat-felled seam on the outside. It saves at least one seam and improves wearability.
Peter,
ReplyDeleteCan you please tell me what size needle you use for sewing denim and do you use the topstitching needle for construction of the entire jeans?
did the hammer technique once, for sewing back pockets. Be careful, don't get too excited with the hammer, the fabric can break and you only see this when you wash the pants (the voice of experience is talking here....). I just got a felling presser foot, so I will use it.
ReplyDeleteThanks, Peter!
ReplyDeletethanks for the instruction. this is my first sew-along and first real sewing project. looking forward to lots of learning.
ReplyDeleteI'll be using the mock flat fell finish, since my machine will almost certainly have kittens if I try to sew through the layers required for the real thing. I don't plan on doing it on the outside seams though; inspection of my jeans has revealed that that seam is never flat felled.
ReplyDeleteMy turn for a stupid question! I've always finished all my seams and exposed edges, but both the pockets on RTW and the instructions on my pattern indicate that this isn't usually done for the patch pockets on jeans (the two on the rear and the one coin pocket in front). Should I do it anyway, to get a neater inside, or are the two rows of topstitching enough? I'm always happy to avoid more work!
I haven't been keeping up with the 'steps' so far but I'm really stoked with the instructions as jeans are so different to make campared to other pants I've made because of the thickness and pocket construction.
ReplyDeleteThanks for a great tutorial and thank you to the commenters for great tips and thinking of queries I would have come to eventually!
Busy day today so will visit the Flickr chat again tomorrow to catch up . I'm having a great learning experience.
Lazysubculturalgirl (that's a mouthful!), I'd just turn the top of the patch pocket under twice and then double (or single, as you prefer) topstitch across the top. I wouldn't finish the other edges; they'll get caught in your topstitching anyway.
ReplyDeleteAnonymous, I'm using two machines and I think both have at least a 14 or 18 needle, which is appropriate for denim (esp. an 18).
ReplyDeletePeter,
ReplyDeleteThe flat felling tutorial is awesome! Thank you! I have two (likely silly) questions. Question 1. If I am going to flat fell the inseam only like my RTW jeans, which parts of the rest of the pant legs should I serge? The outside edge of the back and front legs, the fly, and the crotch? Question 2. How the heck do you serge the fly extension on the front pant legs without either a) missing a good chunk of the curve or b) slicing part of the fly extension off? I've never managed to do this well on other pants I've made and I'm coming to the conclusion that I'm missing some important trick! Any advice welcome!
How do you cut fabric on the floor with 2 chihuahuas 'helping'? I have Tenterfield terriers, which are sorta chihuahuas, so I have to cut on my dining table. But then the cats help...
ReplyDeleteMae, if the dogs are in active-mode, I lock them in their crates.
ReplyDeleteRedrockcity, I'm going to address the whole fly issue shortly. Yes, you'll want to serge the outer leg edges. With the curve on the fly extension, since it's double (cut on the fold), I stitched the curve and turned it, and THEN serged the remaining straight edge.
Crates! What a good idea! I'm afraid our place is a petocracy, and the pets are too old and settled in their ways (and perhaps too numerous) for the humans to successfully claim any rights. One of the cats had to live in a crate for 2 weeks while she was recovering from hip surgery and she made our lives hell with her curses.
ReplyDeleteMmmm. I have been using a mock/fake/faux seam! Time to change to pure flat-fell.
ReplyDeleteI just found you. You are amazing! I have to start using patterns. I try to make everything up--I am sure you can imagine how well that's gone.... I think I once made a shirt and the trauma induced by the sleeves has never left me. i have confined myself to embroidery since then. But you give me hope!!
ReplyDeleteYou are all having so much fun...can't wait until my fabric arrives! Pattern is ready
ReplyDeleteSo, I'm probably worrying about nothing, but does flat felling the seam kind of shift the seam to one side? I am thinking about the center back seam of the jeans. If you sew the two back sides together with the normal 5/8" seam allowance and then carry on making the flat felled seam, then the center of the butt now appears to the left or right of the true middle (depending on which direction you fold over). Should I worry about this or does the ~1/4" not make much difference visually?
ReplyDeleteSiddles, what you say is factually true but entirely insignificant in the finished garment. Please don't worry about it! :)
ReplyDeleteThanks Peter! I need to adjust my pattern, then I am definitely going to be following your flat felling instructions.
ReplyDeleteI just made jeans with flat felled seams. Thanks for the tutorial! I used flat felled for both the back yoke, and the center back, and it does cause the seam to shift to one side. It does bother me a little bit, since it looks like I screwed up, or drafted it funny. Next time, I'm not quite sure what to do with my center back. Maybe press the seam open, and topstitch both to the left and the right? Also, my machine did have a hard time going through two flat felled seams (intersection of back yoke and center back). I did manage it, but a lot of my top thread went through to the back in a mangled mess.
ReplyDeleteKaren, you can do a faux flat-felled seam if you're having trouble matching the seams along the center back: Press the seam allowance to whichever side you need to press it, then, on that same side, edgestitch (less than 1/8" if you can) in your topstitching thread, and then topstitch (on the same side) 1/4" from that. Does that make sense?
ReplyDeleteYou could also start stitching at that thickest point and work your way out in either direction to avoid having that "shifted seam" look.
Some machines are going to have a hard time with all those denim layers -- especially more modern ones -- because they don't have enough piercing power. At least the mangled mess was on the back, or so it sounds.