

Much to cover today so let's get to it. The best way to create a button fly is to look at a pair of RTW jeans and recreate one.
The button fly is essentially an additional fly shield sewn atop the left front fly extension. From now on I will refer to this as the left fly buttonhole shield.


Remember these? They are our right and left fly extensions as viewed from the wrong side (inside) of the pants. (The left fly extension edge is serged; the right side will be stitched and then serged to the right fly shield.) They are folded back at the center of your pants fronts, which you traced off your pattern piece -- or should have.

If you're unsure how I got to this point, please refer to your instructions or review last week's fly post. Everything is the same up until the zipper installation.
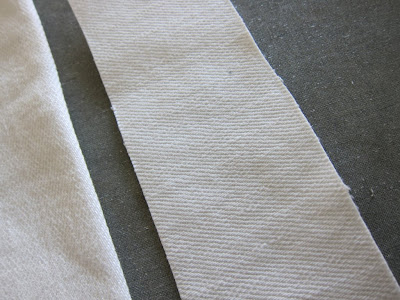
I made the left fly buttonhole shield using the zipper shield pattern piece from Kwik Sew 3504, but instead of cutting it with the curved side on the fold, I did the opposite.

We want the straight edge to be a simple fold. The side that's curved at the bottom will be serged (or overcast) and will face away from the fly.

I reinforced (or interfaced) the left fly buttonhole shield with an additional fly-shaped piece (not cut on the fold) cut perpendicular to the selvage to prevent stretching (width-wise). With this extra fly-shaped piece inside, I then serged the curved edge. So we're talking THREE layers of denim, two parallel to the selvage and one perpendicular. If my denim hadn't had stretch, two layers might have been sufficient.


We want to prevent this from ever happening:

Next, I measured my left fly buttonhole shield against my RTW button fly and marked where the buttonholes should go. Then with my Singer buttonholer attachment I made three holes.

I reinforced the holes with Fray Check, cut them open, and then stitched the left fly buttonhole shield to the left fly extension (and not through the front of the pants) along the outer curved edge. You need to make sure the left fly buttonhole shield does not stick out beyond the front edge of the fly. Remember how the front left fly edge is topstitched? Keep the straight (outer) edge of the shield inside that topstitching line.

From the inside it now looks like this:

I staystitched the top. From the outside it looks like this:

I now topstitched the left front fly (through all left layers), exactly as I did when I made my zipper fly (see Kwik Sew instructions for details). Make sure that when you're topstitching, you're clear of the buttonholes themselves. You can make a single row or double row of topstitching, as you prefer (Most RTW jeans have a double row).

Now let's address the right fly.
You're going to attach the right zipper shield just the way you would have if you'd sewn in a zipper, trimming the edge of the right fly extension (the piece that's part of the right front pants and folded back) at slightly less than half, and attaching the right fly shield, which you've created exactly the way you did for the zipper fly.

Recall that, with the right fly shield, the curved edge is the one cut on the fold, and the straight edge is raw (and will be serged) -- exactly the opposite of the left fly buttonhole shield.

I stitched and serged the right fly shield to the trimmed edge of the right fly extension. I then topstitched this along the vertical front edge from the front, exactly as I would if I'd attached a zipper. (Instead of a zipper, you'll be attaching jeans buttons.) Refer to the Kwik Sew instructions if you're unsure of how to do this.


From the inside, the right front fly extension should extend to the edge of the left fly buttonhole shield. Mine does not quite reach -- next time I'll make my left fly buttonhole shield a little narrower. I may still trim that extra width. (With white denim these details can be visible from the outside; not the case with dark denim.)

Even with RTW jeans, there's often extra width on the left fly buttonhole shield.

Lining up left fly buttonhole shield and right fly extension, I marked with pencil where I needed my small jeans buttons to go and attached them.


Here's how the fly looks buttoned:


And from the inside.

Finally, you'll want to stitch the bottoms of the two shield together and bartack through all layers.

The pant are almost done -- just need to stitch up the sides and add a waistband. He likes them!

Oh -- I haven't even mentioned my new sewing machine yet! More about that tomorrow (short story: $20 on Craigslist) but here's a peek.
LOVE!

Name the model and win a prize.
As always, leave your questions (rhetorical or otherwise) and comments below.
Have a great day, everybody!


How long does it take you to whip a pair up?
ReplyDeleteHow to make a button fly:
ReplyDeleteChuck it across the room.
Seriously great fly tutorial, thanks!
LOL, Steph!
ReplyDeleteAnon, longer than it may seem from these tutorials.
Do women's jeans button on the same side as men's?
ReplyDeleteAn early Singer 99, I believe...
ReplyDeleteGreat tutorial, thank you.
ReplyDeleteThis is fantastic! You make it look easy and now I'm inspired to try.
ReplyDeleteDan, they'd better. LOL
ReplyDeleteRichard, yes, as 99 -- you're the winner!
I am confused as to when you finish the seam from the bottom of the fly to the crotch
ReplyDeleteAmy's right - you DO make it look easy - I've been researching for a pattern. I'm off to by fabric on the 27th (can't invest in anything before that as I have to finsih my Ba before I start a new sewing project!)
ReplyDeleteAnonymous, the seam from the bottom of the fly to the crotch is completed after the fly is done -- just as we did with the zipper fly last week.
ReplyDeleteI double topstitched mine and didn't even finish the edge -- it's cut on a curve and didn't seem like it was likely to fray. You can overcast the seam allowances if you wish, before you sew the seam.
Hi Peter!
ReplyDeleteIt has been fun to follow the Jeans SA! I also think that you got an early model of the Singer 99, because it does not have a stitch lengh regulator with marks... This is a 3/4 size machine and it makes it really cute! I have a 185K, which is an end of 50's version of the model 99 and I love it! It rattles and shake, but it is really fun to sew with it! :)
Dan, there used to be rules about women's clothing fastening on the opposite side from men's...apparently because women were supposed to be dressed by maids (but then men had valets, so that argument never made much sense to me). Someone facing you and doing the dressing would need the buttons on the opposite side. However, jeans are the exception to that rule -- both men's and women's flies work the same way. I run into a very few vintage patterns that still suggest the women's pant flies be attached on the opposite side, but not for jeans and I have NEVER seen this IRL.
ReplyDeleteI attached the waistband today and I might even be done by tomorrow -- or failing that, by Saturday. Hip hip hooray!
Wait, I was going to say it was a 99! I've got one with a knee controller instead of a foot pedal which is a DREAM to sew. England is the land of Singer wonderfulness.
ReplyDeleteAltough I myself hate wearing jeans and have only owned one pair during my 21-years of life, I'm really intriqued by your sew along. The construction is fascinating and I love the way you explain every nifty little detail.
ReplyDeleteI would say your machine is a 99-13. Looks really pretty and handy as a 3/4 sized machine. Your blog has actually introduced me to old machines and I have just about a week ago bought a red eye. Cleand and oiled it and changed the leather band and it works like a dream! Much less noisier and more powerful than my modern machine. Now I just have to learn how to use the threadle...
I think it's a Model 99. DH just brought one home from a Craig's List free posting and it looks exactly like yours. Elizabeth NJ, June 1931 for mine. I haven't tried it yet, though.
ReplyDeleteits a singer featherweight
ReplyDeleteAaron, I'm afraid you get dropped into the crocodile moat. It is indeed a 99.
ReplyDeleteYay, the tutorial is back up (no thanks to Blogger)! Would have been a shame to lose it, as I'm certainly planning on referring to it next time I sew up a pair of trousers!
ReplyDeleteGood thing, this sew-along. However, the fitting issues are covered less than adequately; may I suggest some further reading in this regard:
ReplyDeletehttp://www.cutterandtailor.com/forum/index.php?s=8718e2d8911ea016f5194e5c09bef3dd&showtopic=2335
mici
another try to show the entire link:
ReplyDeletehttp://www.cutterandtailor.com/forum
/index.php?s=8718e2d8911ea016f5194e5
c09bef3dd&showtopic=2335
Mici, I have asked that people bring their individual fit questions to our Flickr group, where I, and a large host of experienced sewists, can address them.
ReplyDeleteperfect! exactly what i was looking for!
ReplyDeleteThis is perhaps one of the few detailed constructions of a button fly on the web - one that someone isn't trying to get paid for demonstrating! It's the first google result anyhow.
ReplyDeleteIn trouser making (in the days before zippers were de rigeur) the extra fly piece with buttonholes is called a 'button catch'.